
本日は、Android Studioを使って地図に吹き出しのピンを立てる方法について説明します。
なお、地図の作り方はこちらの記事を参照してください。

地図を作る準備ができたら、ピンを立てる方法について紹介したいと思います。
地図にピンを立てる
地図にピンを立てる方法はいろとありますが、前回ビットマップ画像を作成してそこにピンを立てる方法について紹介しました。これはこれでカスタマイズ性があって良いですが、多くなると重くなったりするなど面倒なことが起こります。

詳しくは上のリンクをご覧ください
IconGeneratorを使用する
ここで、便利なライブラリーを使います。それがIconGeneratorです。それでは、使い方を見てゆきましょう。
まずは、Gradleに以下のコードを書きます。現時点ではまだ、このコードで良いと思うのですが最新のものを書き込んだ方が無難です。
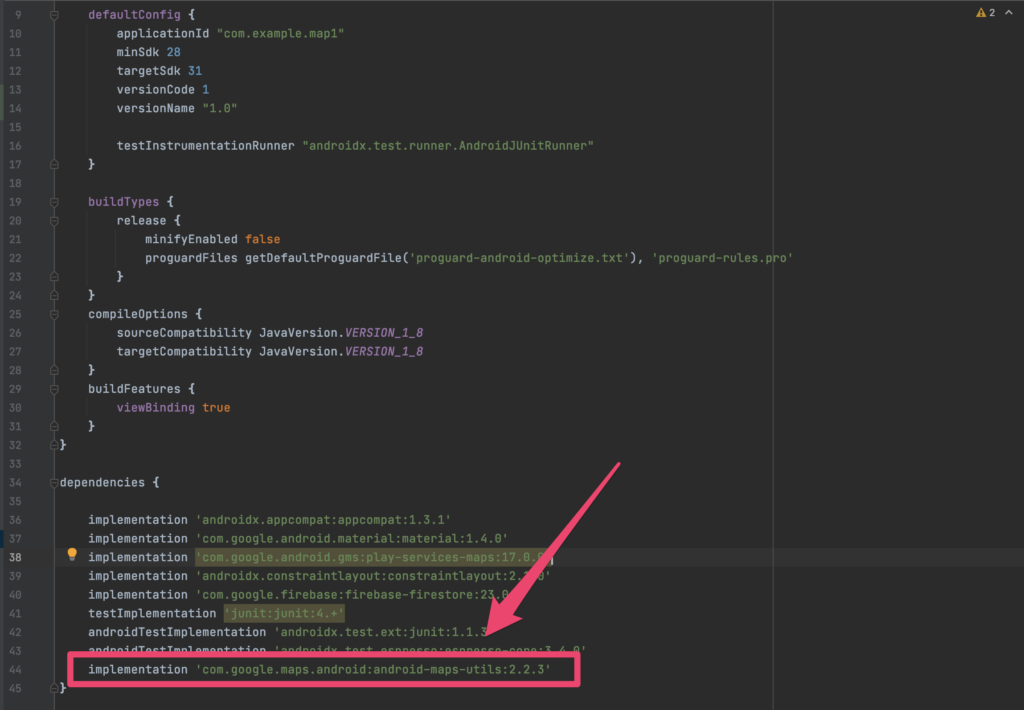
implementation 'com.google.maps.android:android-maps-utils:2.2.3'
上のコードをコピペして貼り付けても大丈夫です。
続いて、コードを貼り付けたら一旦シンクさせます。
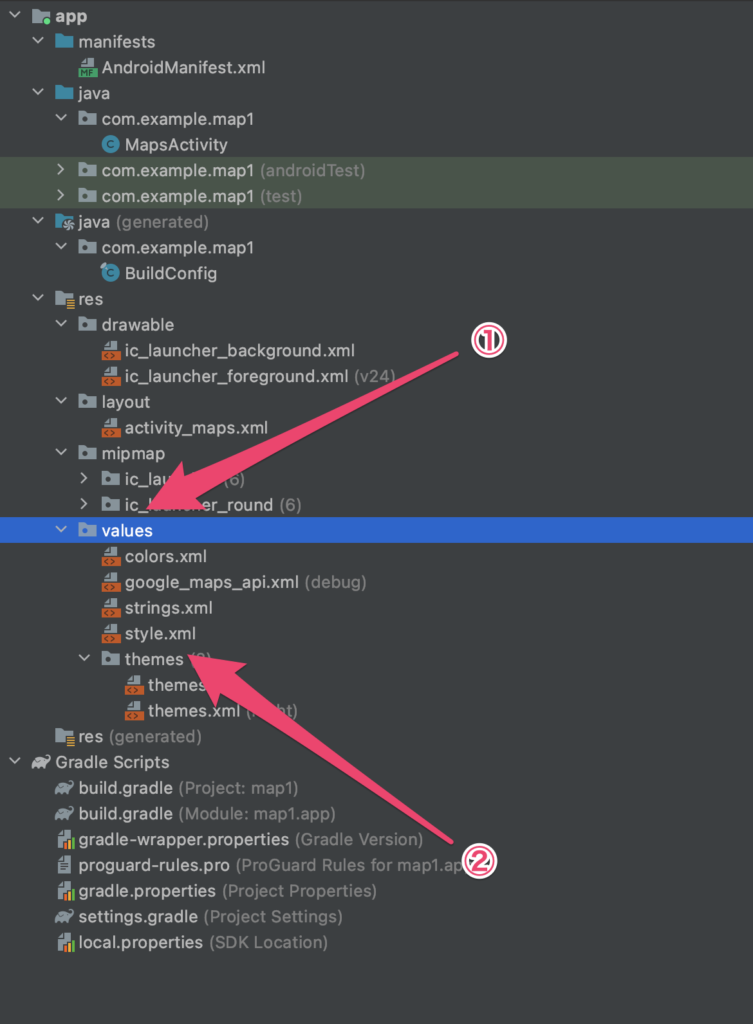
続いてValuesというフォルダを開いてstyle.xmlのリソースファイルを作成します。
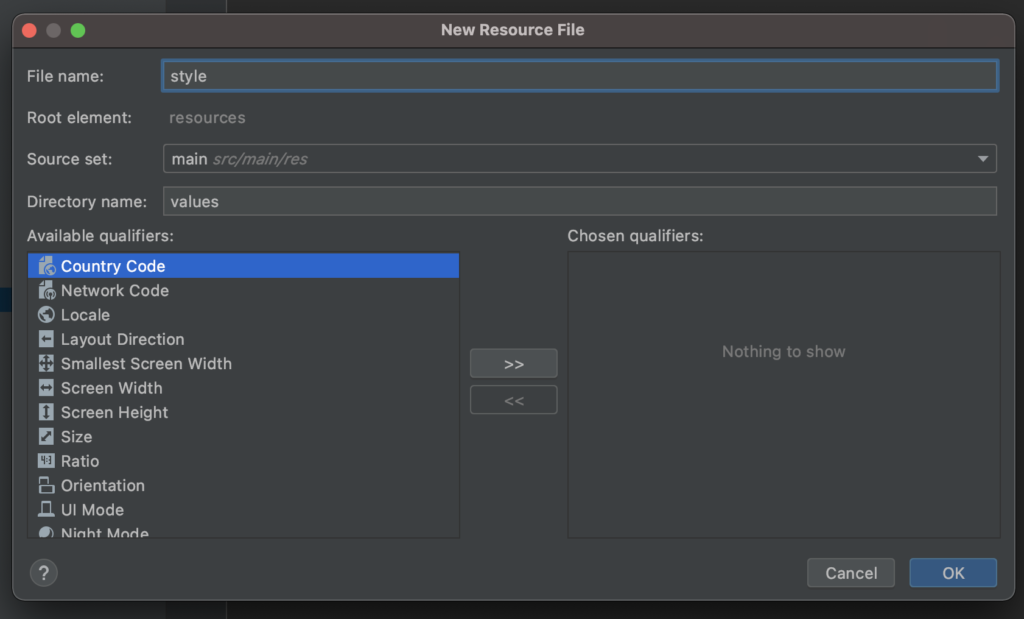
こんな感じですね。
そして、作成したXMLファイルを開き以下の内容を書き込みます。
<?xml version="1.0" encoding="utf-8"?>
<resources>
    <style name="iconGenText">
        <item name="android:textSize">10sp</item>
        <item name="android:textColor">#000000</item>
    </style>
</resources>
これは何をやっているのかというと、吹き出しのフォントのレイアウトなどを定義しているのですね。
なので文字サイズを大きくしたいときはtextSizeを大きくします。
続いて、メインアクティブティに戻って
package com.example.map1;

import static android.content.ContentValues.TAG;

import androidx.annotation.NonNull;
import androidx.fragment.app.FragmentActivity;

import android.graphics.Bitmap;
import android.graphics.Canvas;
import android.graphics.Color;
import android.graphics.Paint;
import android.os.Bundle;
import android.util.Log;

import com.google.android.gms.maps.CameraUpdateFactory;
import com.google.android.gms.maps.GoogleMap;
import com.google.android.gms.maps.OnMapReadyCallback;
import com.google.android.gms.maps.SupportMapFragment;
import com.google.android.gms.maps.model.BitmapDescriptor;
import com.google.android.gms.maps.model.BitmapDescriptorFactory;
import com.google.android.gms.maps.model.LatLng;
import com.google.android.gms.maps.model.MarkerOptions;
import com.example.map1.databinding.ActivityMapsBinding;
import com.google.android.gms.tasks.OnCompleteListener;
import com.google.android.gms.tasks.OnFailureListener;
import com.google.android.gms.tasks.OnSuccessListener;
import com.google.android.gms.tasks.Task;
import com.google.firebase.firestore.DocumentReference;
import com.google.firebase.firestore.FirebaseFirestore;
import com.google.firebase.firestore.QueryDocumentSnapshot;
import com.google.firebase.firestore.QuerySnapshot;
import com.google.maps.android.ui.IconGenerator;

import java.util.HashMap;
import java.util.Map;

public class MapsActivity extends FragmentActivity implements OnMapReadyCallback {

    private GoogleMap mMap;
    private ActivityMapsBinding binding;

    @Override
    protected void onCreate(Bundle savedInstanceState) {
        super.onCreate(savedInstanceState);

        binding = ActivityMapsBinding.inflate(getLayoutInflater());
        setContentView(binding.getRoot());

        // Obtain the SupportMapFragment and get notified when the map is ready to be used.
        SupportMapFragment mapFragment = (SupportMapFragment) getSupportFragmentManager()
                .findFragmentById(R.id.map);
        mapFragment.getMapAsync(this);

        createNewData();

    }

    public void createNewData(){
        FirebaseFirestore db = FirebaseFirestore.getInstance();

        // Create a new user with a first and last name
        Map<String, Object> user = new HashMap<>();
        user.put("positionX", -20);
        user.put("positionY", 162);
        user.put("title", "OK Google");
        user.put("markerTitle", "Fuck you!");

    // Add a new document with a generated ID
        db.collection("users")
                .add(user)
                .addOnSuccessListener(new OnSuccessListener<DocumentReference>() {
                    @Override
                    public void onSuccess(DocumentReference documentReference) {
                        Log.d(TAG, "DocumentSnapshot added with ID: " + documentReference.getId());
                    }
                })
                .addOnFailureListener(new OnFailureListener() {
                    @Override
                    public void onFailure(@NonNull Exception e) {
                        Log.w(TAG, "Error adding document", e);
                    }
                });
        readData(db);
    }
    public void readData(FirebaseFirestore db){
        db.collection("users")
                .get()
                .addOnCompleteListener(new OnCompleteListener<QuerySnapshot>() {
                    @Override
                    public void onComplete(@NonNull Task<QuerySnapshot> task) {
                        if (task.isSuccessful()) {
                            for (QueryDocumentSnapshot document : task.getResult()) {
                                Log.d(TAG, document.getId() + " => " + document.getData());
                            }
                        } else {
                            Log.w(TAG, "Error getting documents.", task.getException());
                        }
                    }
                });
    }

    /**
     * Manipulates the map once available.
     * This callback is triggered when the map is ready to be used.
     * This is where we can add markers or lines, add listeners or move the camera. In this case,
     * we just add a marker near Sydney, Australia.
     * If Google Play services is not installed on the device, the user will be prompted to install
     * it inside the SupportMapFragment. This method will only be triggered once the user has
     * installed Google Play services and returned to the app.
     */
    @Override
    public void onMapReady(GoogleMap googleMap) {
        mMap = googleMap;
        // Add a marker in Sydney and move the camera
        LatLng sydney = new LatLng(-34, 151);
        mMap.addMarker(new MarkerOptions().position(sydney).title("Marker in Sydney").icon(getTextMarker("Hello")));
        mMap.moveCamera(CameraUpdateFactory.newLatLng(sydney));
        setMarkerOnMap(-20,162,"Ok google","Fuck you!");
        setMarkerOnMap(-19,162,"Ok google","Fuck you!");
        setMarkerOnMap(-18,162,"Ok google","Fuck you!");
        setMarkerOnMap(-17,162,"Ok google","Fuck you!");
        setMarkerOnMap(-16,162,"Ok google","Fuck you!");

    }
    public void setMarkerOnMap(int positionX, int positionY,String title, String markerTitle){
        IconGenerator icg = new IconGenerator(this);
        icg.setColor(Color.WHITE); // green background
        icg.setTextAppearance(R.style.iconGenText); // black text
        Bitmap bm = icg.makeIcon(markerTitle);
        // Add a marker in Sydney and move the camera
        LatLng position = new LatLng(positionX, positionY);
        mMap.addMarker(new MarkerOptions().position(position).title(title).icon(BitmapDescriptorFactory.fromBitmap(bm)));
        //mMap.moveCamera(CameraUpdateFactory.newLatLng(position));
    }

}
これを書き込みます。
特に重要なのがsetMarkerOnMapメソッドの
    public void setMarkerOnMap(int positionX, int positionY,String title, String markerTitle){
        IconGenerator icg = new IconGenerator(this);
        icg.setColor(Color.WHITE); // green background
        icg.setTextAppearance(R.style.iconGenText); // black text
        Bitmap bm = icg.makeIcon(markerTitle);
        // Add a marker in Sydney and move the camera
        LatLng position = new LatLng(positionX, positionY);
        mMap.addMarker(new MarkerOptions().position(position).title(title).icon(BitmapDescriptorFactory.fromBitmap(bm)));
        //mMap.moveCamera(CameraUpdateFactory.newLatLng(position));
    }
この部分ですね、positionX、positionYに座標をtitleにクリックしたときに表示される文字列をmarkerTitleには吹き出しマーカーに表示される文字列を渡します。
これはonMapReadyが呼び出された後に必ず行ってください。そうしないとエラーになります。
んで、実際にビルドしてみると
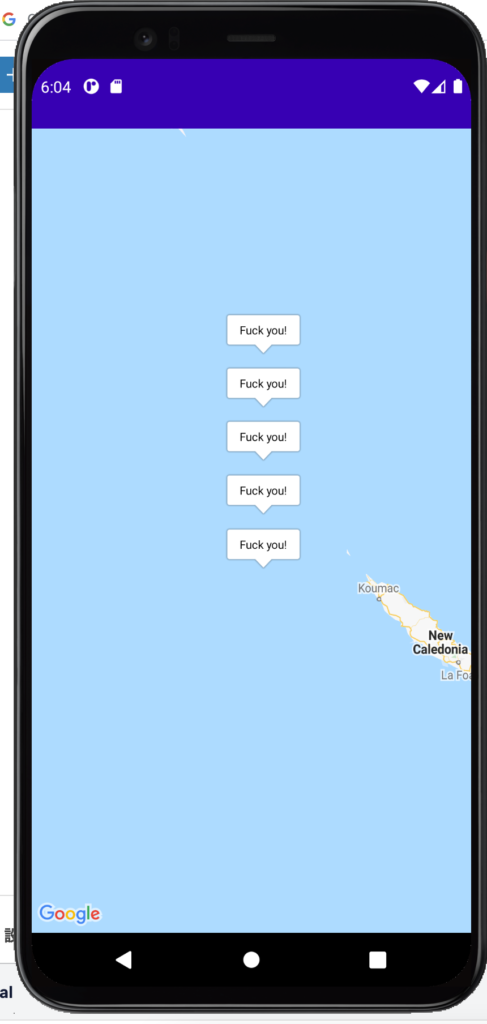
こんな感じで表示されました。